Tuesday, February 5, 2013

Pasting Paths in the Adobe Environment

Every time I spend half an hour figuring out a two-second fix, I swear at the gods of the internet for not requiring people to post their useful knowledge in public forums for me to find. Then I realize that I haven't posted since October, and I get all red and shame-faced. 

So here's my latest and greatest quick tip for you:

If you are trying to copy and paste a path from Adobe Illustrator into Adobe After Effects, and you would like to use that path as a motion path, the original path cannot have any fill or stroke applied before you copy it. If it does, even if you paste it into a position or path attribute, it will turn into a mask (or possibly many masks, if you have a dashed stroke). 

If you didn't understand the above paragraph, here's the basic situation:
  1. You would like something to move along a path in After Effects, but you have the path stored elsewhere (likely in Illustrator). 
  2. This is normally simple - you go into Illustrator, use the Selection tool to select the path, press Ctrl+C to copy. Go into After Effects and click on the Position  attribute of the thing you want to move, and press Ctrl+V to paste. A keyframe should appear where your cursor was. To expand this, hold down Alt and drag the keyframe out to the right. 
  3. Unfortunately, if your original path in Illustrator had a fill or a stroke applied, AE will interpret this as a mask - possibly many of them - rather than a stroke. You will be able to see the path, but it will be in bright green, meaning it's a mask. Position paths appear in light purple. 
  4. Solution: just make sure you have the bare path selected before you copy/paste across programs.
Did this help you? Have any other ideas for how to accomplish the same thing? Let me know!

Sunday, September 16, 2012

Cider Review and Sundry


Umm....hi. *shuffle* Do you, ah, radio silence much? Oh! Good. Me too.

Hard Cider Review Series - Introduction and Week # 1


I had big plans for this blog (remember this?), but it turns out that moving for a month straight, plus every deadline at work converging on the same date, plus a (new! awesome!) huge apartment that surprisingly takes much longer to clean than the one that was 1/3 the size....it turns out that all that is a perfect recipe for blogland radio silence.

Luckily for y'all (Sorry...I went a little bit country for a while there): 
Right behind me is a North Carolina wild water bear. Was terrifying. 
...so luckily for you all, I have a couple blog-worthy ideas and projects in the works. The first (and most self-serving) is a new (hopefully weekly?) series of hard cider reviews, culminating (hopefully) in a batch of (hopefully) delicious homemade hard cider. (You can read a great series of beer reviews from the guy who suggested this here). See, two things I adore about the northeast are a real autumn and the prevalence of hard cider. I also adore cider.


Buh. This happens *every year* and no one talks about it. Lordy.
I'll try to review a cider every week or two throughout the autumn, and maybe at the end of it all, I'll have accumulated all the stuff I need to make some cider at home. Maybe there'll even be a tutorial.

With no further ado, here's week one's review: 


This is Samuel Smith's Organic Cider, which claims to be made from organically grown apples. I tend not to be too concerned about organic produce or food, but it's nice for some folks to have that option. 

According to the bottle, it comes from the UK (although there is an "agent" name on there with a Washington ZIP code), and is 5.0% ABV. I found it singleton, one-pint bottles in my local supermarket in Boston(ish), so it looks like they've got a pretty widespread distribution.

The label is a slightly-kitschy, old-timey illustration of some apples and a few apple blossoms. It honestly looks like a plate that my grandmother would have hung on the wall. Not a fan, to be honest, but it's different, and it did get me to buy the thing.

Mr. Smith describes the cider as "a medium dry cider with brilliant straw color, light body, clean apple flavour and a gentle apple blossom finish" and suggests pairings like pork dishes, cream soups, or a salad with vinaigrette dressing (er...bit of a non-sequitur with the salad? You decide. I went with risotto, myself.). 

I chilled the cider in my fridge for a while (read: weeks) before I had the chance to drink it, so it was nice and cold when I finally pulled it out. The color is pretty spot-on straw colored, and a bit more orangey than some of the other ciders I've had. It hasn't got much of a smell to it - mostly sweet, with the tiniest hint of apple. 

On tasting it, my first impression was that it tastes more intensely of apples than a lot of other brands. You know how big apples tend to be kind of bland, but smaller ones are sweeter and more flavorful? That's the difference here. It's got a nice quick hit of apple at the beginning, then backs off in to a sweet, clean flavor. I think that "medium dry" might be the wrong term here - it's very sweet to my palate. They do add sugar to their cider, according to the ingredients list. The bottle claims it has an "apple blossom finish" but damned if I can taste it. I get almost no aftertaste here.

The carbonation is on the lower side, which is sort of unfortunate, because more than anything, the taste reminds me of straight-up apple juice. It's a good flavor, very apple-y, but if I'm going to drink a hard cider, I want it to differentiate itself from Welch's as much as possible. I think more carbonation would help that. 

So to sum up: a pleasing cider with a pretty good alcohol content and strong apple flavor, but could back off on the sugar a bit and be more daring with the taste. An organic option for those who care about such things.

Oh...I have to have a rating system? Ah. I guess...how about...four Galas and a couple of Fujis? Is that good? Yes? Yes.


So what are you going to be drinking for the fall season? 


Monday, July 30, 2012

Tech Support from the Trenches: Computer Beeping on Startup


For this particular problem, I'm going to cut right to the chase, because DAMN, that beeping is annoying, isn't it?

Symptoms of this problem:

- You are using a LSI MegaRAID 9260-4i card (confirmed) or potentially -8i (unconfirmed)
- On startup, computer makes LOUD beeping noise - 1 second beeps, continuously, starting midway through the boot process
- Computer DOES boot into OS (still beeping)
- In Windows, you cannot see your RAID array, either in Windows Explorer or in Disk Manager

Other things that may, but probably don't, matter:
- OS: Windows 7x64
- Lenovo S20 Workstation
- RAID array configured as RAID 0


What's (probably) going on: 
For whatever reason, the RAID controller card could not see one or more of the disks in your RAID array for some period of time - it could be cables got jostled (were you just poking around in the tower?), or that the firmware is not up to date (according to LSI tech support - I have not tested this myself). Because of this, the unseen drives were declared "unconfigured bad." You need to fix this in the controller BIOS. If you do this properly, no data will be lost (and ain't that a fine thing?).

Solution:

Unfortunately, you will have to endure the beeping while you complete the below. It will stop after you import the "foreign" configuration.

1. Power up and press Ctrl+H to enter the RAID controller BIOS.

2. Select your RAID array from the start screen menu. For you lucky people with more than one RAID array, make sure you know which one you're selecting (although it will be obvious later if you haven't selected the right one). Press Start.

Sorry - no screen caps at the BIOS level. 

3. On the homepage, you should see that one or more drives are marked in black and declared "FOREIGN" and "unconfigured bad". There should also be corresponding "missing" drives marked in red.


4. Click on "Drives" on the left-hand side.

5. Select a drive marked as bad (Select in top window and click Properties>Go). There are radio buttons on the bottom of the screen where you can change the status from "unconfigured bad" to "unconfigured good".

6. Go back to the home screen. If you've done everything right, you should see the drives you edited at the bottom in blue. The problem drives will still appear as missing - that's fine.


7. Click on Scan Devices. You should see a screen offering to import foreign configurations. In the drop-down, select "All configurations" and hit "Preview".

Holy glare, Batman.
8. Check the configuration it shows you to make sure it matches your original RAID configuration. (IMPORTANT: If the configuration is NOT exactly your original config, do not import it. There is a high probability that doing so will erase all your data.) On the other hand, if it does match exactly (and there's no reason it shouldn't), no data will be lost, which is pretty nifty when you think about the way RAID arrays work. 

9. If everything matches, click "Import". (Beeping should stop at this point.)

10. Exit the controller BIOS and restart your computer.


Did this work for you? If it did, help some other folks out and leave a comment with your system specs, anything you did differently, etc. The internet will thank you.


Contents of this post courtesy of time spent at TechnoFrolics, which is a very cool company and you should go check them out.

Wednesday, July 25, 2012

DIY: The Lazy, Procrastinating Gardener's Tomato Cage

Let me be blunt. I am a lazy, lazy gardener. I spent all of June watching my tomato plant get bigger and bigger, bloom madly, start sporting the tiniest of green tomatoes, which turned into larger tomatoes, and are currently weighing down the plant to the point of cracking the stem. And all of June, I was telling myself that I'd better buy a tomato cage now, otherwise I wouldn't be able to get it around the whole plant when I really needed to. Well, it's the end of July, and there is no tomato cage on the market that would comfortably and easily support my ginormous tomato plant.

Eleven of....I stopped counting.
This left me this morning in the uncomfortable position of needing to build a tomato cage that was 1) fairly cheap, 2) flexible, 3) modifiable (to accommodate new growth), and 4) dead simple to put together. Well. Two out of four ain't bad.

I'm writing this up because a few minutes of googling didn't turn up anything similar to this, and I figure there must be a couple more procrastinating newbie gardeners out there who might like to follow along. 

The Lazy Gardener's Tomato Cage

Note: this guide is just to show you what I did and maybe give you some ideas. You should assume in general that if you modify any particular step to suit your needs, the world will not end. 

What to do:

0. Put on sunscreen if you're going to be outside. You always wear sunscreen, right?

1. Gather your supplies. Here's what I used:


From top to bottom and left to right, that is:

  • (4) .75"x.75"x6' gardening stakes
  • (1) tomato plant, badly in need of staking
  • (1) hand saw (optional)
  • (1) claw hammer
  • (1) 550-ft ball of sisal twine (you won't use nearly 550 feet - maybe 1/3 of that if you're generous)
  • appx. (60) 1.5" wood nails
  • (4) 2"x0.5"x24" gardening stakes
  • Not shown: pocket knife or scissors to cut the twine
Of all of these, you really only need to be particular on the hammer, in that without it, you will fail really badly at this project. The other items are up for customization - three foot tall stakes? Fine. One inch nails? Also good. Cucumber plant instead of tomato? Golden. Just for reference, here are the brands of nails and twine that I used:


2. This step is optional - if you don't care whether your top struts have pointed ends, you can go on to number 3. If you are slightly worried about having pointy garden stakes around eye height, by all means - read on. (Also a disclaimer: be careful with that saw. Use proper sawing technique and wear eye protection. If you hurt yourself, it'll be because you were being stupid like me. Don't be stupid like me.)

Now you should just saw off the pointy ends of your shorter garden stakes. It doesn't really matter how much you lop off - I took just over an inch off the ends. 

If you do cut off the ends of your stakes, please don't do it like I did. Get a vise or something. 

This is not smart.


Some tips on sawing:

  • To start a cut, draw the blade of the saw very lightly several times over where you want the cut to be. The idea is to start a groove in the wood so that the saw blade naturally comes to rest there. 


About like this.
  • When you're sawing, don't press the blade of the saw down into the wood. To cut more quickly, you actually want to lessen the pressure and saw quicker.
  • Make sure all your motions are exactly parallel to your cut. It's easy to bend the blade and jam it, which can damage your saw and seriously slow down your cutting. 
So saw lightly and quickly, and soon you should have nicely squared off garden stakes:

Taking a minute to note that grain. Awesome. 
You can use your first sawed-off stake to mark the others, so they're all the same length, but that's not entirely necessary. Approximate measurements are fine here.

Not really 100% necessary.

3. Once you've done all four stakes, it's time to move on to the legs of the cage. What we're doing here is just studding one side of each leg with nails so that we have something to catch the twine on later. Add more nails than you think you need here - it's going to be very difficult to add more once the cage is standing. 

Take one of your cage legs and pick a spot at the top (the non-pointy end) to put your first nail. Find a hard, flat, level surface (or if you're me, a bumpy, inclined lawn) and hammer it in until you can just see the tip on the opposite side. 


It's a good idea to hammer the point back from the other side so it's flush with the stake. You don't want unexpected nails anywhere, ever.

Now hammer in 9 (or more or less, your choice) more nails down the length of the stake. I used the nail box as a spacer, but you can just eyeball it, if you want.


When you're done, you should have something that would be an excellent weapon in the zombie apocalypse.

Be careful with this.
As of the current moment, there is no zombie apocalypse, so you can hammer the nails over so they're bent parallel to the longest dimension of the stake, heads pointing upwards:

Makeshift hooks or a first-grade woodshop project gone wrong.
Now do the same for your other three long stakes. It's a lot of hammering, but fairly easy, low-pressure hammering.

4. There's a tiny bit of hammering left, but it's pretty painless. I hammered three nails partway into each shorter stake to serve as hooks on the top of the cage. I don't have a great picture of this, but you can sort of get the idea:


Of course, do this for all of your shorter stakes.

5. I had very ambitious plans to nail this whole thing together, but it turns out that without a proper vise setup, it's very difficult to nail one thin, low quality piece of wood to another, thinner, low quality piece of wood, especially when you're holding the entire setup in one hand and a hammer in the other hand, standing on the stairs so that you can reach the top of the stake. Bad idea.

I ended up lashing all of the pieces together with twine, which has the disadvantage of taking quite  a bit of time, but the benefit of looking pleasantly rustic when finished.

I'm sure there's a better way to do this, but here's how I went about it:


Hammer a nail in about 1/2 inch from the edge of one of your top stakes and bend it over like the others. That makes a nice place to anchor your twine. Cross your short strut with a long one so that about one inch of each is overlapping.


You should have a very lopsided X - the bottom legs of the X are ridiculously long, and the top ones are ridiculously short. Take your twine that's anchored at the nail, and wrap it in a figure eight around the short legs. Give it maybe 8-10 turns. I went a bit crazy with the twine and it took forever - you don't have to.


Now wrap the twine in a figure eight around the longer legs of the X. Once you have those two sets of wrapping in place, you can wrap anywhere you like. I don't have pictures of what else I did, but do what makes sense to you to limit the flexibility of the joint. You can wrap horizontally around the point where they cross, vertically, weave around the intersection, etc. Presumably the sailors in the audience can point out some better ways to do this.


Attach two long struts to each of two short struts, so that in the end you have two pi-shaped frames.
Pi, not pie.
6. This step is probably the trickiest, and of course the one I don't have any pictures of. What you want to do is take one of your remaining two short stakes, and lash it so that it sticks out perpendicular to the frame in question (perpendicular to the ground in the above photo). I put mine in the inside corner, between the long legs of the X, but you don't have to - you could put it on top, or on the side even - whatever's easiest, just make sure that you do the same thing to both frames. 

Also, before you lash the last short stake to its frame, make sure that when you're done, both three-legged frames will fit together! Up until here, the frames have been mirror images of each other, but in this step you need to line things up before you make anything permanent. 

When you're done with this step, you should have two identical pieces, each with two long legs and two short ones. When you stand them up together, they should form a rectangular prism shape - like a big box.

7. Doing really horribly with the pictures here - after an hour of wrapping twine, my fingers were green, and I really wanted to go drink some lemonade. 

 I hope this step is obvious - stand up your two frames and tie them together! Your smaller stakes should end up at the top, with the longer "feet" free and able to move a bit to accommodate uneven ground.

8. Now for the fun part - position your frame over your tomato plant. Using all those nails you hammered into the frame in the beginning, tie lengths of twine between the frame legs looping underneath your tomato plant to hold it up as needed. You can use any pattern here, but I liked the even look I got by tying the twine straight across. Diagonal wrapping would also work. 

And there you have it: one very lazy tomato cage!


All that wrapping with the twine gives the cage some flexibility, so I made the base wider than the top so that it would be a little more balanced. 

Some of my branches really needed some extra support, so I ended up looping the twine over the top struts, which are stronger than the "ladder rungs" that everything else is resting on. I also left loose ends after I tied the twine to the nails - I think it looks kind of rustic-chic, when really all it is is lazy.


How did your tomato cage turn out? Let me know!

Monday, July 9, 2012

Basil Lemonade - A Recipe for Amateur Bloggers

My introduction to the blogging world (well...the good blogging world - Xanga doesn't count, although other good things have come out of that) was through food blogs. Blogs like Smitten Kitchen, Macheesmo, and Culinary Concoctions by Peabody have a way of taking the ordinary (remember cheese-sandwich blogs? This is what I had for lunch today...and this is what I had for lunch yesterday) and giving it the Hollywood treatment. To this day, I'll turn to a food blog for a new recipe over America's Test Kitchen or The Joy of Cooking. Where a cookbook has very little leeway to go off and talk about how you should go about altering recipes when you live in a tiny apartment with an oven that runs a hundred degrees hot, you might find a food blogger (who hopefully has several hundred readers/commenters) who is in exactly your predicament. The best bloggers also have a bit of an artistic eye, and can make beef stew in an old brown dish look like something from El Bulli.

This is just to say, I am not one of those food bloggers. What I am is a warmish Bostonian with a summer afternoon off, gorgeous light coming through the south-facing windows, and quite a lot of basil in the fridge.

Lemonade? Lemonade.


Basil Lemonade Recipe

Before I start, I should add a disclaimer: what I'm making here is not straight-out-of-the-pitcher drinkable. It's more of a lemonade concentrate that you pour into a glass and add water to taste. So take these ratios with a grain of salt and far less sugar than I used.

Ingredients:

8 lemons or limes or some combination thereof
2 cups sugar
2 cups water + extra to taste
2 cups fresh basil 

Helpful equipment:

A sharp kitchen knife
A 2-liter pitcher
A citrus juicer (I have something like this)


Process

1. Start making your simple syrup. Combine 2 cups of water and 2 cups of sugar (or any 1:1 ratio) in a saucepot. Turn the heat up to medium-ish. Stir until the sugar dissolves. Simmer for 5 minutes, then remove from heat. And let cool slightly. 

2. Once the syrup has cooled (not a lot - you should just barely be able to stick a finger in it without burning yourself), bruise the basil lightly and add it to the pot, reserving some for garnish. Let sit while you juice the lemons, or for at least 20 minutes.

3. Cut all of your citrus in half. Squeeze into your serving pitcher.

4. Once your syrup has cooled significantly (room temperature or so), pour it into the pitcher and stir.

5. Fill the rest of the pitcher with water.

Serving:

Pour about 4 oz. of lemonade concentrate into a glass. Add water and ice to taste. Garnish with reserved basil sprigs.


You can follow the recipe above (mentioning again: concentrate, not something you want to chug), or you can do it the way I did it.


Once you've assembled your ingredients, you should realize that you'd like to blog about this later, and that the light is perfect, and you may not get another chance like this for weeks. Get your camera.

Set up in front of the only part of the apartment not covered in books or dishes or small pieces of electronics and carefully frame your shots so both the ugly box fan and the ugly radiator never appear.


Start taking pictures of your ingredients, then realize that it's de rigeur to assemble everything first and take a "group shot". Also take a moment to note that the tomato situation in the background has gotten very much out of hand.


Get out your limes and lemons and put them in a pot. Measure out the last two cups of sugar and vow to go to CVS later so your boyfriend won't be sad in the morning when he has no sugar for his coffee. Get out a huge handful of basil that you bought from the store, even though your herb garden has gone wild downstairs. Tell your boyfriend that it's because you want to make basil-something-else later in the week, and you don't want to decimate the basil crop. 


Start taking artsy shots of your food. Pretend you're a food stylist.

You can use all lemons, all limes, or some combination. I tend to favor lemons, so I used a 5:3 ratio (one wouldn't fit nicely in the pot).


Pour your two (!) cups of sugar into a saucepot. Don't try to replace this with artificial sweetener. The result is something very much unlike the lemonade we're making here.


Add two cups of water. (You could be using any 1:1 ratio. Simple syrup keeps for months in the fridge, so make extra if you're so inclined.)

I made an artistic choice not to show you my tiny, tiny kitchen with the stubborn splatters on the wall, so just believe me when I say that I put the pot on the stove and turned the heat up to medium. I also stirred until the sugar dissolved, and let it simmer for five minutes. Then I took it off the heat to cool down slightly.


In the meantime, juice your citrus. Like Alton Brown, I am against unitaskters. HOWEVER. 
  • This particular unitasker just about doubles the amount of lemon juice I can get out of a lemon.
  • It is less than fun to hand-squeeze sixteen lemon halves.
I justify it by thinking of all the money I'm saving by not buying double the amount of lemons. 


Cut all of your citrus in half. 

Take a picture of the helpful bird that's wandered by.


Now, I have a question for you folks. Wouldn't you think that, lemon juicers being shaped as they are, you'd put the lemon in this way?


So did I. But I was over on Smitten Kitchen the other day, and she had put the lemons (limes, actually) in upside-down, so the rind was facing up, like so:


I tried it both ways, and I have to say that the upside-down way works better to catch the seeds, although you do get a bit more pulp. Which way do you use a lemon juicer?


If you're diligent, you can get about a third of a liter of juice out of eight lemons. Try squeezing each one twice or three times, shifting the rind a bit each time, to get the most juice out of them. I think limes are a bit more juicy "per capita" than lemons, but this recipe is so flexible, it shouldn't matter.


Leave your artfully stacked citrus rinds for the moment, and go back to your pan of simple syrup. You want to catch it before it cools down to room temperature, but after it's done simmering. Luckily, since there's so much sugar in it, this is quite a long window. Your goal is to infuse the syrup with basil flavor without denaturing the alcohols that give it its smell and taste.

Test your syrup to see if it's cooled down enough by putting a small basil leaf in and stirring. If after 30 seconds, the leaf is still mainly bright green, that's a good temperature. If it wilts and turns a dull green or brown, put the pan in the fridge for a few minutes to cool off. 

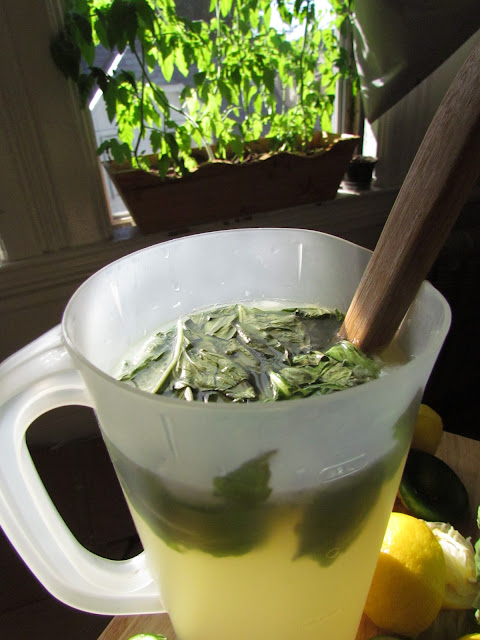
Add your giant handful of basil to the pan. The more basil you use here, the happier you will be later. (Do save a few sprigs for a garnish - that's not just an aesthetic thing, it's important for the taste, too.) 


Stir and let sit. The longer you let this sit, the more intense the basil flavor will  be. (Also, folks, if you wanted to stop right here, pour all of this in a dish, throw it in the freezer and stir it every hour or so, you'd end up with an unusual and very refreshing basil granita. I won't tell.)


After 20 minutes (or however long you can wait), add about half the syrup into the pitcher. I added the whole darn thing, and it was too sweet, so take it slowly! (Alternative option: add water first and sweeten to taste.) 

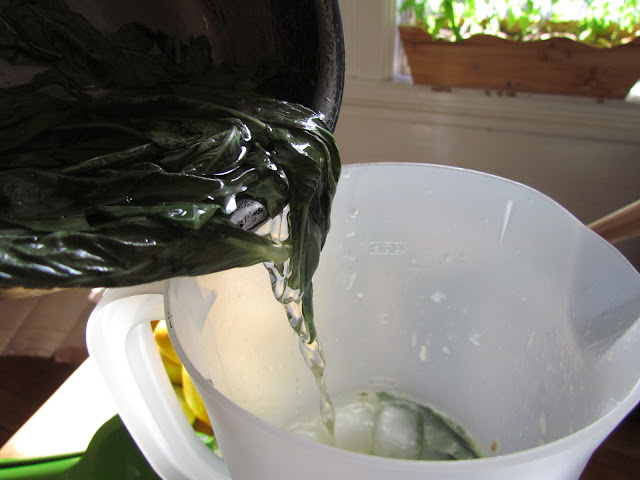
Take a moment to note that the differing viscosities between water and simple syrup give this photo a different character than the photo of the water pouring above.


Add water to the top of the pitcher, and you're done!  Leave the basil in there. It'll get better with time.


Notes:
  • This is very sweet, very concentrated lemonade. I would cut down on the sugar next time, and I love sweet things.
  • Having made this with 8 lemons vs. a mixture of limes and lemons, I'd say that the limes cut the tartness a little bit, although they were juicier. I can't say I have a strong preference either way.
  • A 1:1 ratio of concentrate to water makes a pretty darn good drink, although it could be tarter.
  • A basil garnish is a must. Smell is the better part of taste, and although you will taste the basil if you let your syrup sit long enough, burying your nose in a sprig of basil as you go to take a drink really hits it home. 
  • Folks, if you don't try this with gin, your world will be darker and smaller forever.
Have you tried basil lemonade before? Let me know in the comments!

A midsummer gardening update

I should really go around and take good pictures of all the lovely growing things around here, but there's really only one important thing here:


Eeeeeee tiny tomato!

Wednesday, June 27, 2012

What I learned today:June 27, 2012

Meine Damen und Herren, Illustrator...has spellcheck.


I know. I was shocked too. So where is spellcheck in Illustrator? Right here:


More specifically, under the Edit menu in CS5.5. As long as your text is still formatted like text (not rasterized, etc.), spellcheck will...well, check your spelling.